
How to Add Front and Back Covers to a Coloring Book
Add a front cover, a back cover, or both when you create a coloring book — or attach covers later to an existing project with Inspire me.
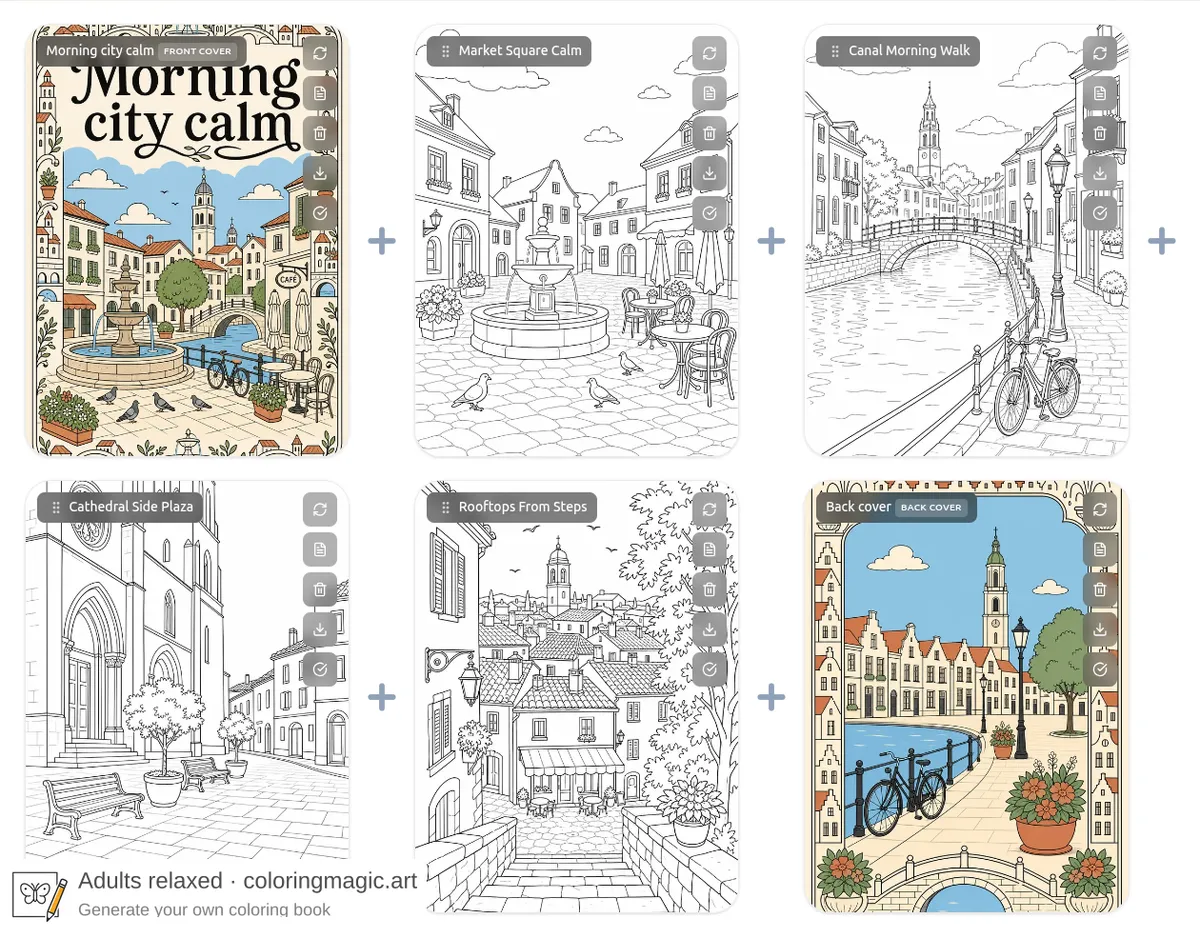
A finished coloring book looks more complete with real covers — not just a stack of outline pages. Coloring Magic Art can add a decorative front cover, a decorative back cover, or both. Covers use theme-matching flat colors and ornamental artwork that echoes what is inside.
Each cover is a special page:
- Front cover — at most one per book, always first in the PDF. Full-color decorative artwork with your title lettering on it.
- Back cover — at most one per book, always last in the PDF. Full-color decorative artwork that matches the theme. By default it has no lettering; if you want text, ask for it in the scene prompt.
Coloring pages between the covers stay black-and-white outlines to color in.
You can add covers in two ways: turn them on in the book wizard, or add them later to a project that already has coloring pages. A practical workflow is to draft cheaply at Low quality, then raise quality and regenerate when the scenes look right.
What you need
- A Coloring Magic Art account with tokens for image generation (see pricing)
- Either a new book idea for the wizard, or an existing project in the editor
For a full walkthrough of creating a book from scratch, see Create Your Own Coloring Book. For what costs tokens, see What Costs Tokens (and What Is Free).
Option A — Include covers when you create a new book
The book wizard can draft front and/or back cover prompts alongside your coloring page prompts, so you review everything in one place before you click Generate.
Step 1 — Choose Front cover and/or Back cover
Open My Books and click Create with AI. On Step 1 of 3 — Configure, find the Cover section below your page and age settings.
Turn on Cover, then enable Front cover, Back cover, or both. Each selected cover counts as one extra page beyond the page count you selected — the footer shows the combined total (for example, 4 pages + both covers = 6 pages).
| Option | What you get |
|---|---|
| Front cover | Decorative cover with your book title and theme-matching colors. Always page one. |
| Back cover | Decorative closing page that matches your book theme. Always last. No title field — lettering only if you ask for it in the scene prompt. |
Leave quality on Low for a first pass if you want to test scenes cheaply. You can raise quality and regenerate later — covered at the end of this guide.
Step 2 — Draft and edit cover prompts
Click Draft pages. The wizard writes prompts for your coloring pages and, for every cover option you turned on, a separate cover prompt too. This step is free — no tokens are spent until you generate images.
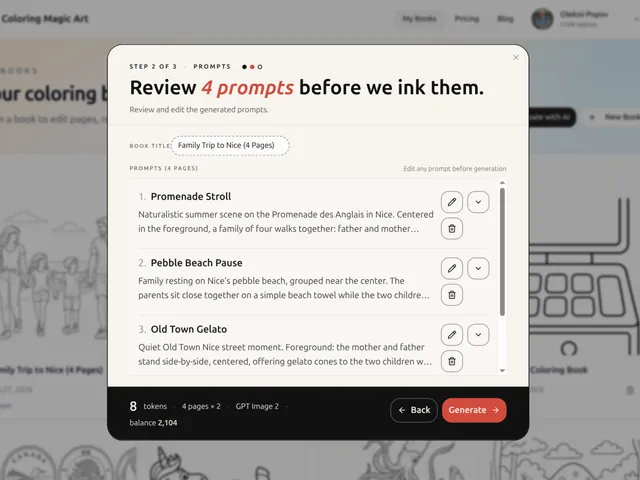
On Step 2 of 3 — Prompts, the headline and prompts label use the full billable count (pages + covers). Covers appear with badges:
- The front cover is item 1., marked (Front cover).
- Coloring pages follow in the middle.
- The back cover is last, marked (Back cover).
Front cover fields
| Field | What it controls |
|---|---|
| Title text | The large lettering on the cover. Starts from your book title. |
| Color palette | A comma-separated list of flat fill colors (for example sky blue, warm cream, terracotta, sage green). |
| Scene prompt | Decorative border, frame, and motifs around the title. |
Back cover fields
| Field | What it controls |
|---|---|
| Color palette | Flat fill colors for the decorative artwork. |
| Scene prompt | Motifs and overall look. By default the draft has no lettering. Put any text you want in this prompt. |
Click any field to edit it inline. Expand a scene prompt to read the full text. Saving the overall book title updates the front cover title to match when possible.
To drop a cover entirely, click the trash icon on that cover row. You can turn the option back on from Step 1 and draft again if you change your mind.
Step 3 — Generate
Click Generate. The wizard creates your project, places the front cover first (if enabled), coloring pages in the middle, and the back cover last (if enabled), then starts image generation. Covers render as full-color artwork; coloring pages render as outlines.
You can also grab the watermarked sample from this walkthrough (front cover included):
Option B — Add covers to an existing book
Already have coloring pages but no cover — or only one of the two? Add the missing cover from the editor without rebuilding the whole book. A book can have at most one front cover and at most one back cover.
You can start from the book menu (three dots → Add Front Cover / Add Back Cover) or from the dashed add page card at the end of the grid. The screenshots below use the add-page card and Inspire me, which drafts the scene prompt and color palette from your existing pages.
Add a front cover with Inspire me
- Open your project in the editor.
- Open the dashed add page card and choose Add Front Cover.
- In the dialog, keep or edit the title text, then click Inspire me to fill the color palette and scene prompt from your book.
- Click Add & Generate (or Save and generate) to insert the cover at the front and start image generation.
The dialog is already set for a front cover — there is no toggle to switch cover type.
Add a back cover with Inspire me
When the front cover exists (or you only need a back), open the add-page card again and choose Add Back Cover.
The back cover dialog has color palette and scene prompt only — no separate title field. Inspire me and Improve default to no lettering unless you ask for text in the prompt. Click Add & Generate to place the cover last and start generation.
Raise quality and regenerate before you print
Draft covers and pages at Low quality to check composition and colors cheaply. When the book looks right, open Book settings, raise quality (for example to Medium or High), save, and confirm regeneration so every page — including both covers — rerenders at the new setting.
When it finishes, download the PDF from the editor toolbar. The front cover is page one; the back cover is last. An Amazon KDP interior leaves both covers out of the file. See Printing Profiles for an Amazon KDP Interior.
Token cost
Each cover counts as one generated image, billed like any other page at your chosen model and quality settings.
| Action | Costs tokens? |
|---|---|
| Turning on Front cover / Back cover in the wizard | No — until you click Generate |
| Wizard or Inspire me cover prompts and palettes | No |
| Editing cover fields before generation | No |
| Generating or regenerating a cover image | Yes — one page worth per cover |
| Regenerating the whole book after a quality change | Yes — every selected page, including covers |
| Downloading the PDF | No |
If you create a four-page book with both covers enabled, you pay for six images total: front cover + four coloring pages + back cover. Prompt drafting and edits remain free; see What Costs Tokens (and What Is Free) for the full list.
Tips for covers that fit your book
- Match the theme. Let borders and ornaments echo what is inside — city streets, holidays, mandalas, classroom units.
- Keep the front title short. One to four words read best at print size.
- Name your colors. Use plain color names in the palette field (
sunflower yellow, sky blue, grass green). - Back cover: no text by default. Leave the back decorative unless you explicitly want a tagline in the scene prompt.
- Draft low, print high. Generate at Low, check the title and colors, then regenerate at Medium or High before you print.
- Do not reorder covers. The front cover always stays first; the back cover always stays last. Coloring pages in between can be reordered.
Related guides
- Create Your Own Coloring Book
- What Costs Tokens (and What Is Free)
- Understanding Pricing and Tokens
- Printing Profiles for an Amazon KDP Interior
Want to make something similar?
We'll open the book wizard with this idea already filled in so you can customize it.
You might also like
More articles with overlapping topics.